
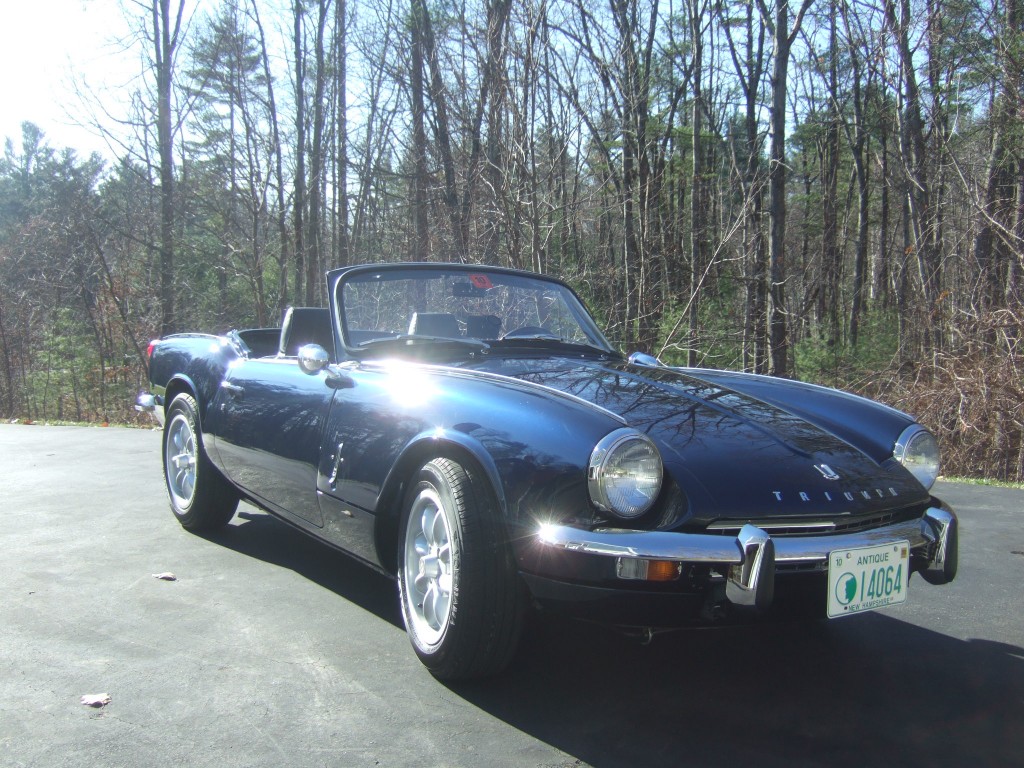
Clean Side View
Project Start:
This is a running collection of the restoration of a 1970 Triumph Spitfire Mk III (USA), built May 1970, Comm #: FDU88319 L, Engine: FE47322E, Paint #: 56 (Royal Blue), Trim #: 11 (Black), Body #: 82220FG.
The path to doing this restoration was not what I intended. I had just spent a few years collecting donor cars and parts to do a 1965 Triumph TR4A and was suddenly called by a friend asking if I was still interested in Triumphs and if I wanted his Spitfire. He had run into some health issues and needed to dump the car while it was still in pieces. I codenamed this project “Shemp”, since as I was collecting donor cars for my TR4A project, we started calling them “Mo” (1965 TR4A), “Larry” (1965 TR4) and “Curly” (1962 TR4).
At first it sounded like something I could throw together for a summer driver while working on my TR4A. But after picking it up, I realized that was not possible and it should have gone to the crusher, since it suffered severe metal damage over the years. But after spending a day getting it running, and cleaning out about five 5 gallon buckets of mice and chipmunk nests, I decided to do a frame off restoration.
This was the fall of 2005, and I spent time over that winter tearing the car apart and documenting each step. Unfortunately, it was already partially pulled apart, and many details were missing. The interior was stripped and the seats were gone. The rear heal board was already cut out and repairs started, which turned out to be a real issue later since I had no documentation on what it originally looked like, and all the dimensions were gone and I had to start from scratch when I started putting the metal work together.
Project Plan:
The first thing I decided to do, was document the plan. It is the best way to stay on track and not get caught up buying parts you will not need until later in the project.
I decided to break it up into three phases, and broke the part orders into three groups.
Phase 1: Disassemble and refurbish the chassis and engine. Here I took a lot of pictures of where things were attached and how wires were run, so I could remember how to put them back. I posted some of the pictures on the site, but have a much more complete set put aside. Under this section I list a lot of the steps I went through in getting all separate areas completed and various upgrades.
Phase 2: Metal work and body work. I intended to do all the metal, body work and paint myself, but realized that after putting so much work into the chassis and the metal work, that learning how to do the bodywork and paint, not to mention the purchase of all the required air filtration, paint guns and such, that for this car I would farm the bodywork and painting out to a local shop that I found through a friend who had his ’69 Firebird done by the place. Under this step I document all the repair panels I had to purchase and the steps I went through to get the car back together. Once you see what I had to start with, you will see this was a very involved job.
Phase 3: This is the final step of outfitting the car. I have the body back on the car (painted bottom and outside) and I am fitting the wiring harness, dash components, exterior trim, interior and getting the car basically road ready.
Project Start:
Here is what the car initially looked like when I picked it up (minus the mice and chipmunk nests I already cleaned out), notice it was not even on wheels, but roll around dollys.

Passenger side in its initial state.
This looks a lot better than it turned out to be. Initially the driver side was supposed to be the worse side, but as I started to cut it apart, the lower sections of the B-pillars and the entire rocker were shot, mostly due to an earlier application of fiberglass that sealed in water that rusted out any remaining metal.

Initial view of the back of the car.
Notice that the rear valance is pretty much shot and all the external trim was already removed. The trunk looked like it was salvageable, until I removed the dealer badge and found the entire rear edge was rotted from the inside out. I luckily found one online that was already blasted and primed from a 1969, so it already had the lettering holes drilled out.
That fact, along with the nose coming from a 1967 Mk-III, made me revert to pre-1970 external layout, which I liked better. I removed the side markers and added back the lettering. Since I only had one side marker cutout left, it was not a hard decision to make.

Initial state of the front of the car.
As you can see from here, the windshield is gone, and was missing while it was exposed to the elements for some time. This later turned out to be an even bigger deal than just causing the floors to be in bad shape. All the gauges, dashboard, crash pad frame and electrical switches are all shot, see some pictures in thee dis-assembly pages. I thought I could salvage the nose, but wound up driving 6 hrs to get one off a 1967 Mk III in Caribou Maine (never want to go there again).

Initial state of the interior of the car.
I will only show one interior shot now. It pretty much sums up the state of the car. I wound up cutting the car in half, keeping only the upper part of the front bulkhead and the rear wheel wells and parts of one rear quarter and the tranny tunnel. The rear valance and trunk were even cut out.
When I am completed, I will post the after pictures here. But for now, I will only post a catalog shot of what a 1970 Mk III is supposed to look like. This particular example is a true 1970 with the new badging and safety side markers along with wire rims. Due to the replacement parts not having holes for the side markers and having the lettering already, and the fact I think the pre ’70 version is a much cleaner looking car, I reverted to the earlier layout. I also made some internal improvements; for example I added a rear (swing) string and larger sway bar from a Mk IV to improve handling as well as a light weight flywheel, wood dash with chrome bezels, alternator and a few other items.

Sample Spitfire